此示例Python使用Selenium调用Chrome浏览器并通过代理进行自动化测试。
import timeimport stringimport zipfilefrom selenium import webdriverfrom selenium.webdriver.chrome.service import ServicetargetURL = "http://myip.ipip.net" # 访问的目标站点proxyHost = "61.171.76.145" # 代理IP地址proxyPort = "50353" # 代理IP端口号authKey = "x" # 代理IP的AuthKeypassword = "x" # 代理IP的AuthPwddef create_proxy_auth_extension(proxy_host, proxy_port, proxy_username, proxy_password, scheme='http', plugin_path=None): if plugin_path is None: plugin_path = r'./{}_{}_qgnet_proxyauth_plugin.zip'.format(proxy_username, proxy_password) manifest_json = """ { "version": "1.0.0", "manifest_version": 2, "name": "Chrome Proxy", "permissions": [ "proxy", "tabs", "unlimitedStorage", "storage", "", "webRequest", "webRequestBlocking" ], "background": { "scripts": ["background.js"] }, "minimum_chrome_version":"22.0.0" } """ background_js = string.Template( """ var config = { mode: "fixed_servers", rules: { singleProxy: { scheme: "${scheme}", host: "${host}", port: parseInt(${port}) }, bypassList: ["localhost"] } }; chrome.proxy.settings.set({value: config, scope: "regular"}, function() {}); function callbackFn(details) { return { authCredentials: { username: "${username}", password: "${password}" } }; } chrome.webRequest.onAuthRequired.addListener( callbackFn, {urls: [""]}, ['blocking'] ); """ ).substitute( host=proxy_host, port=proxy_port, username=proxy_username, password=proxy_password, scheme=scheme, ) with zipfile.ZipFile(plugin_path, 'w') as zp: zp.writestr("manifest.json", manifest_json) zp.writestr("background.js", background_js) return plugin_pathif __name__ == '__main__': # 此处指定您的webdriver路径,版本需要跟您所使用的Chrome版本一致, # 下载地址https://registry.npmmirror.com/binary.html?path=chromedriver/ driver_location = "./chromedriver/chromedriver_v106_win.exe" proxy_auth_plugin_path = create_proxy_auth_extension( proxy_host=proxyHost, proxy_port=proxyPort, proxy_username=authKey, proxy_password=password) option = webdriver.ChromeOptions() option.add_argument("--start-maximized") # 窗口最大化运行 option.add_extension(proxy_auth_plugin_path) # 添加proxy插件 # 此处selenium版本为4.8.0 driver = webdriver.Chrome(service=Service(driver_location), options=option) driver.get(targetURL) time.sleep(100) driver.quit()
此示例Python使用Selenium调用Chrome浏览器并通过代理进行自动化测试。
from selenium import webdriverfrom selenium.webdriver.chrome.service import ServicetargetURL = "http://myip.ipip.net" #访问的目标站点proxyAddr = "您的代理IP:端口号" if __name__ == '__main__': browser_location = r".\Chrome\chrome.exe" #指定浏览器路径位置 driver_location = r".\Chrome\chromedriver.exe" #指定Driver路径位置 option = webdriver.ChromeOptions() option.binary_location = browser_location #设置浏览器位置 option.add_argument("--start-maximized") #窗口最大化运行 option.add_argument('--proxy-server=%(server)s' % {"server": proxyAddr}) driver = webdriver.Chrome(service=Service(driver_location), options=option) driver.get(targetURL) print(driver.page_source)
import base64import timeimport requestsfrom requests.adapters import HTTPAdapterauth_key = "请改成您的Key"password = "请改成您的AuthPwd"tunnel_server = "http://请改成您的隧道地址" # 如:tunnel3.qg.net:19263target_url = "https://ip.cn/api/index?ip=&type=0" # 要访问的目标地址proxy_headers = {}proxy = { "http": tunnel_server, "https": tunnel_server}def encode_authorization(key, passwd): # python 使用 bytes 类型进行 base64 编码 basic_str = bytes("%s:%s" % (key, passwd), "ascii") # 得到的返回值也是 bytes 类型,所以需要再 decode 为字符串 return "Basic %s" % base64.b64encode(basic_str).decode("utf-8")def reset_tunnel_proxy_headers(): global proxy_headers proxy_headers = { tunnel_server: { "Proxy-Authorization": encode_authorization(auth_key, password) } }def update_tunnel_proxy_headers(key, val): global proxy_headers proxy_headers[tunnel_server][key] = valdef new_session(): adapter = TunnelProxyAdapter() se = requests.Session() se.mount('https://', adapter) se.mount('http://', adapter) return seclass TunnelProxyAdapter(requests.adapters.HTTPAdapter): def proxy_headers(self, p): if p in proxy_headers: print("session with headers:", proxy_headers[p]) return proxy_headers[p] else: return Nonedef multi_channel_tunnel(): """ 结果类似: request on multi channel request id: 1 , channel id: channel-1, code: 200, result: 183.155.88.224 request id: 2 , channel id: channel-2, code: 200, result: 125.112.38.153 request id: 3 , channel id: channel-3, code: 200, result: 183.155.89.125 request id: 4 , channel id: channel-4, code: 200, result: 49.71.121.169 request id: 5 , channel id: channel-5, code: 200, result: 115.210.67.220 request id: 6 , channel id: channel-6, code: 200, result: 36.25.41.178 request id: 7 , channel id: channel-7, code: 200, result: 180.125.162.116 request id: 8 , channel id: channel-8, code: 200, result: 140.250.150.158 request id: 9 , channel id: channel-9, code: 200, result: 121.227.102.227 request id: 10, channel id: channel-10, code: 200, result: 49.88.106.198 request id: 1 , channel id: channel-1, code: 200, result: 183.155.88.224 request id: 2 , channel id: channel-2, code: 200, result: 125.112.38.153 request id: 3 , channel id: channel-3, code: 200, result: 183.155.89.125 request id: 4 , channel id: channel-4, code: 200, result: 49.71.121.169 request id: 5 , channel id: channel-5, code: 200, result: 115.210.67.220 request id: 6 , channel id: channel-6, code: 200, result: 36.25.41.178 request id: 7 , channel id: channel-7, code: 200, result: 180.125.162.116 request id: 8 , channel id: channel-8, code: 200, result: 140.250.150.158 request id: 9 , channel id: channel-9, code: 200, result: 121.227.102.227 request id: 10, channel id: channel-10, code: 200, result: 49.88.106.198 """ print("request on multi channel") reset_tunnel_proxy_headers() for i in range(1, 11): se = new_session() chan_id = "channel-%s" % i update_tunnel_proxy_headers("Proxy-TunnelID", chan_id) resp = se.get(target_url, proxies=proxy, headers={"Connection": "close"}) print("request id: %-2s, channel id: %s, code: %s, result: %s" % (i, chan_id, resp.status_code, resp.text)) time.sleep(10) # 因为固定时长为1分钟,所以在1分钟内继续使用已有通道,仍是之前的IP for i in range(1, 11): se = new_session() chan_id = "channel-%s" % i update_tunnel_proxy_headers("Proxy-TunnelID", chan_id) resp = se.get(target_url, proxies=proxy, headers={"Connection": "close"}) print("request id: %-2s, channel id: %s, code: %s, result: %s" % (i, chan_id, resp.status_code, resp.text))if __name__ == "__main__": multi_channel_tunnel()package mainimport ( "fmt" "io/ioutil" "net/http" "net/url" "sync" "time")/** 返回内容 第一次循环 当前 IP:121.230.91.188 来自于:中国 江苏 泰州 电信 当前 IP:60.184.205.115 来自于:中国 浙江 丽水 电信 当前 IP:125.112.205.149 来自于:中国 浙江 金华 电信 当前 IP:60.184.108.175 来自于:中国 浙江 丽水 电信 当前 IP:58.214.87.31 来自于:中国 江苏 无锡 电信 当前 IP:183.143.131.24 来自于:中国 浙江 湖州 电信 当前 IP:42.53.99.119 来自于:中国 辽宁 锦州 联通 当前 IP:59.60.142.70 来自于:中国 福建 漳州 电信 当前 IP:114.226.175.159 来自于:中国 江苏 常州 电信 当前 IP:123.162.194.223 来自于:中国 河南 驻马店 电信 max channel reached 第二次循环 当前 IP:114.226.175.159 来自于:中国 江苏 常州 电信 当前 IP:60.184.205.115 来自于:中国 浙江 丽水 电信 当前 IP:121.230.91.188 来自于:中国 江苏 泰州 电信 当前 IP:125.112.205.149 来自于:中国 浙江 金华 电信 当前 IP:123.162.194.223 来自于:中国 河南 驻马店 电信 当前 IP:58.214.87.31 来自于:中国 江苏 无锡 电信 当前 IP:183.143.131.24 来自于:中国 浙江 湖州 电信 当前 IP:60.184.108.175 来自于:中国 浙江 丽水 电信 当前 IP:59.60.142.70 来自于:中国 福建 漳州 电信 当前 IP:42.53.99.119 来自于:中国 辽宁 锦州 联通 第二次循环返回的IP与第一次循环相同,因为goroutine是异步的,所以返回顺序和第一次不一致 myip.ipip.net服务器可能比较容易失败,用户可以自己找一个其他获取客户端IP的服务器来测试*/// 固定时长多通道隧道模式func main() { authKey := "请改成您的Key" //固定时长1分钟的隧道,通道数10 password := "请改成您的AuthPwd" proxyServer := "请改成您的隧道地址" //如:tunnel3.qg.net:19263 targetURL := "https://ip.cn/api/index?ip=&type=0" rawURL := fmt.Sprintf("http://%s:%s@%s", authKey, password, proxyServer) proxyUrl, _ := url.Parse(rawURL) wg := sync.WaitGroup{} wg.Add(11) // 十个通道分别使用不同的十个IP,第十一次会返回错误,通道数超出 for i := 0; i < 11; i++ { go func(index int) { defer wg.Done() client := http.Client{ Transport: &http.Transport{ ProxyConnectHeader: http.Header{ "Proxy-TunnelID": []string{fmt.Sprintf("channel-%d", index)}, // 指定通道ID }, Proxy: http.ProxyURL(proxyUrl), }, } req, _ := http.NewRequest("GET", targetURL, nil) rsp, err := client.Do(req) if err != nil { fmt.Printf("request failed: %s\n", err) return } defer rsp.Body.Close() body, err := ioutil.ReadAll(rsp.Body) if err != nil { fmt.Println(err) } else { fmt.Println(string(body)) } }(i) } wg.Wait() // 因为固定时长为1分钟,所以在1分钟内继续使用已有通道,仍是之前的IP time.Sleep(time.Second * 10) wg.Add(10) for i := 0; i < 10; i++ { go func(index int) { defer wg.Done() client := http.Client{ Transport: &http.Transport{ ProxyConnectHeader: http.Header{ "Proxy-TunnelID": []string{fmt.Sprintf("channel-%d", index)}, // 指定通道ID }, Proxy: http.ProxyURL(proxyUrl), }, } req, _ := http.NewRequest("GET", targetURL, nil) rsp, err := client.Do(req) if err != nil { fmt.Printf("request failed: %s\n", err) return } defer rsp.Body.Close() body, err := ioutil.ReadAll(rsp.Body) if err != nil { fmt.Println(err) } else { fmt.Println(string(body)) } }(i) } wg.Wait()}import requeststargetURL = "https://ip.cn/api/index?ip=&type=0" //要访问的目标地址proxyAddr = "请改成您的隧道地址" //如:tunnel3.qg.net:19263authKey = "请改成您的Key"password = "请改成您的AuthPwd"# 账密模式proxyUrl = "http://%(user)s:%(password)s@%(server)s" % { "user": authKey, "password": password, "server": proxyAddr,}proxies = { "http": proxyUrl, "https": proxyUrl,}for i in range(10): resp = requests.get(targetURL, proxies=proxies) print(resp.text)import base64import timeimport requestsfrom requests.adapters import HTTPAdapterauth_key = "请改成您的Key"password = "请改成您的AuthPwd"tunnel_server = "http://请改成您的隧道地址" //如:tunnel3.qg.net:19263target_url = "https://ip.cn/api/index?ip=&type=0" // 要访问的目标地址proxy_headers = {}proxy = { "http": tunnel_server, "https": tunnel_server}def encode_authorization(key, passwd): # python 使用 bytes 类型进行 base64 编码 basic_str = bytes("%s:%s" % (key, passwd), "ascii") # 得到的返回值也是 bytes 类型,所以需要再 decode 为字符串 return "Basic %s" % base64.b64encode(basic_str).decode("utf-8")def reset_tunnel_proxy_headers(): global proxy_headers proxy_headers = { tunnel_server: { "Proxy-Authorization": encode_authorization(auth_key, password) } }def update_tunnel_proxy_headers(key, val): global proxy_headers proxy_headers[tunnel_server][key] = valdef new_session(): adapter = TunnelProxyAdapter() se = requests.Session() se.mount('https://', adapter) se.mount('http://', adapter) return seclass TunnelProxyAdapter(requests.adapters.HTTPAdapter): def proxy_headers(self, p): if p in proxy_headers: print("session with headers:", proxy_headers[p]) return proxy_headers[p] else: return Nonedef normal_tunnel(): """ 结果类似: request on normal mode session with headers: {'Proxy-Authorization': 'Basic xxxx'} request id: 1, code: 200, result: 140.250.149.229 """ reset_tunnel_proxy_headers() print("request on normal mode") resp = new_session().get(target_url, proxies=proxy) print("request id: 1, code: %s, result: %s" % (resp.status_code, resp.text))def mark_tunnel(): """ 结果类似: request with mark session with headers: {'Proxy-Authorization': 'Basic xxxx', 'Proxy-TunnelID': 'channel-1', 'Proxy-TTL': 10} request id: 1 , code: 200, result: 183.166.118.48 request id: 2 , code: 200, result: 183.166.118.48 request id: 3 , code: 200, result: 183.166.118.48 request id: 4 , code: 200, result: 183.166.118.48 request id: 5 , code: 200, result: 183.166.118.48 request id: 6 , code: 200, result: 183.166.118.48 request id: 7 , code: 200, result: 183.142.59.203 request id: 8 , code: 200, result: 183.142.59.203 request id: 9 , code: 200, result: 183.142.59.203 request id: 10, code: 200, result: 123.54.235.89 """ reset_tunnel_proxy_headers() update_tunnel_proxy_headers("Proxy-TunnelID", "channel-1") update_tunnel_proxy_headers("Proxy-TTL", 10) se = new_session() print("request with mark") for i in range(1, 12): resp = se.get(target_url, proxies=proxy, headers={"Connection": "close"}) print("request id: %-2s, code: %s, result: %s" % (i, resp.status_code, resp.text)) time.sleep(1)if __name__ == "__main__": normal_tunnel() mark_tunnel()package mainimport ( "fmt" "io/ioutil" "net/http" "net/url" "sync" "time")func main() { authKey := "请改成您的Key" password := "请改成您的AuthPwd" proxyServer := "请改成您的隧道地址" //如:tunnel3.qg.net:19263 targetURL := "https://ip.cn/api/index?ip=&type=0" rawURL := fmt.Sprintf("http://%s:%s@%s", authKey, password, proxyServer) proxyUrl, _ := url.Parse(rawURL) client := http.Client{ Transport: &http.Transport{ Proxy: http.ProxyURL(proxyUrl), }, } req, _ := http.NewRequest("GET", targetURL, nil) rsp, err := client.Do(req) if err != nil { fmt.Printf("request failed: %s\n", err) return } defer rsp.Body.Close() body, err := ioutil.ReadAll(rsp.Body) if err != nil { fmt.Println(err) } else { fmt.Println(string(body)) }}package mainimport ( "fmt" "io/ioutil" "net/http" "net/url" "sync" "time")/** 返回内容 当前 IP:114.219.115.191 来自于:中国 江苏 苏州 电信 当前 IP:114.219.115.191 来自于:中国 江苏 苏州 电信 当前 IP:114.219.115.191 来自于:中国 江苏 苏州 电信 当前 IP:114.219.115.191 来自于:中国 江苏 苏州 电信 当前 IP:114.219.115.191 来自于:中国 江苏 苏州 电信 当前 IP:114.219.115.191 来自于:中国 江苏 苏州 电信 当前 IP:114.219.115.191 来自于:中国 江苏 苏州 电信 当前 IP:114.219.115.191 来自于:中国 江苏 苏州 电信 当前 IP:114.219.115.191 来自于:中国 江苏 苏州 电信 当前 IP:114.219.115.191 来自于:中国 江苏 苏州 电信 当前 IP:14.118.211.116 来自于:中国 广东 江门 电信*/func main() { authKey := "请改成您的Key" password := "请改成您的AuthPwd" proxyServer := "请改成您的隧道的地址" //如:tunnel3.qg.net:19263 targetURL := "https://ip.cn/api/index?ip=&type=0" rawURL := fmt.Sprintf("http://%s:%s@%s", authKey, password, proxyServer) proxyUrl, _ := url.Parse(rawURL) client := http.Client{ Transport: &http.Transport{ ProxyConnectHeader: http.Header{ "Proxy-TunnelID": []string{"channel-1"}, // 在CONNECT连接中新增Proxy-TunnelID打标记 "Proxy-TTL": []string{"10"}, // Proxy-TTL指定该标记IP的存活时间 }, Proxy: http.ProxyURL(proxyUrl), }, } // 因为标记的存活时间是10s,所以循环11次中有10次的IP是一样的。 // 第11次因为标记的IP到期了,系统会自动替换IP wg := sync.WaitGroup{} wg.Add(11) for i := 0; i < 11; i++ { go func() { defer wg.Done() req, _ := http.NewRequest("GET", targetURL, nil) rsp, err := client.Do(req) if err != nil { fmt.Printf("request failed: %s\n", err) return } defer rsp.Body.Close() body, err := ioutil.ReadAll(rsp.Body) if err != nil { fmt.Println(err) } else { fmt.Println(string(body)) } }() time.Sleep(time.Second) } wg.Wait()}1.备份原有的yum库
mv /etc/yum.repos.d/CentOS-Base.repo /etc/yum.repos.d/CentOS-Base.repo.backup![]()
2.下载新的CentOS-Base.repo 到/etc/yum.repos.d/
wget -O /etc/yum.repos.d/CentOS-Base.repo http://mirrors.aliyun.com/repo/Centos-7.repo
3.添加EPEL
wget -O /etc/yum.repos.d/epel.repo http://mirrors.aliyun.com/repo/epel-7.repo
4.清理缓存并生成新的缓存
yum clean all

yum makecache

5.这样就安装完成了
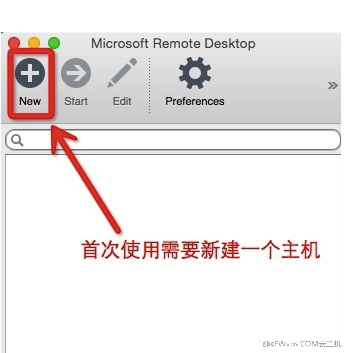
1.首先在APPSTOR下载“Microsoft Remote Desktop”应用

2.在打开的“Microsoft Remote Desktop”窗口中,单击“New”图标按钮,来创建一个新的远程主机
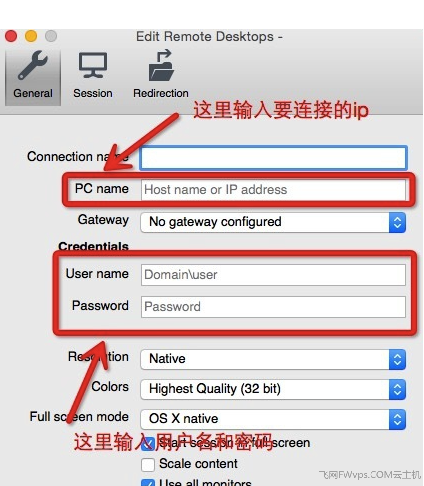
3.根据图片上得文字描述,输入需要连接的用户名密码,和ip地址。
PC Name:这里输入你要连接的远程计算机IP地址
UserName:平时登录计算机的用户名
Password:登录计算机的密码
输入以上信息后,直接关闭窗口就可以了,系统会自动保存
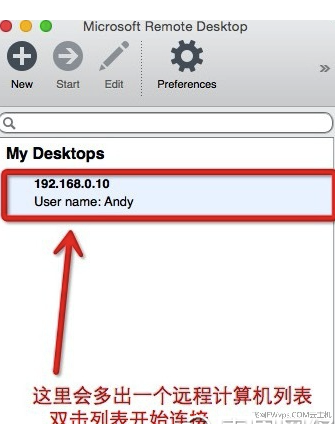
4.新建远程计算机后,在列表内就会出现了,您只需要双击就可以连接了
6.当您双击列表开始连接后,正常就会看到这个提示框了,单击“Continue”继续就可以了
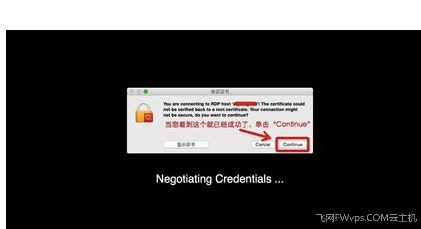
7.Yes,已经成功连接至Windows系统了

在Windows 7系统下如何解决宽带连接提示错误692问题呢?

出现此错误提示可能是频繁拨号导致,此时需要重启下系统。打开“运行”,输入shutdown -r -t 0,然后点击“确定”即可重启。重启后即可恢复

尊敬的飞网客户:
2022年五一即将到来,飞网祝您节日快乐,合家辛福!
飞网五一放假安排如下:
2022年4月30日至5月4日放假调休,共5天。5月5日正常上班。
假期如果您想购买我们产品,请直接在网站上在线支付购买,目前网站支持支付宝等在线支付方式,在线支付的客户全部是即时到帐,直接在线购买开通。
如果您是银行付款,请付款后电话至4007-567-365,财务会在10分种内给您处理好。
售后服务方面,假期您的售后服务专员QQ可能不在线,如有急事打公司值班手机18936527027,我们会在10分钟内为您提供所要的服务。
顺祝商祺!
江苏山阳网络科技有限公司
2022年4月28日
工作在线时间:早上9:00-下午10:00
江苏山阳网络科技有限公司

 苏公网安备32080302000160号 工信部ISP/IDC许可证:B1-20235479
Copyright © 2008-2026 公司地址:江苏省淮安市淮阴区南昌北路9号淮阴软件园A8幢420室